How to Connect iPhone to Windows PC: The Complete Step-by-Step Guide
- Admin
- Nov 14, 2025
- 5 min read
Connecting your iPhone to a Windows PC permits you to transfer photos from iPhone to Windows, sync files with iTunes, create a backup data and even manage your iPhone in smarter ways. While many iPhone users trust on macOS for seamless incorporation, Windows users can also enjoy a bond between their iPhone and PC by various handy tools and settings.
In this inclusive guide, we’ll see the various ways to connect your iPhone to a Windows PC like, via USB cable, iTunes, iCloud, and Bluetooth. Whether you want to transfer photos from iPhone to Windows, sync music, or manage files, this step-by-step guide will help you to achieve them.
Advantages: Why Connect iPhone to Windows PC?
These are the main advantages of connecting your iPhone to your Windows 11 PC:
Transfer Photos and Videos – Easily transfer your media from iPhone to your Windows PC for editing, backup and other requirements.
Sync Music and Files – Use iTunes to sync your music, playlists, or documents.
Backup Your iPhone – Keep your data safe by creating local backups on your computer.
Manage Storage – Delete or move large files from iPhone to Windows PC.
Use iPhone as a Hotspot – Share your mobile internet with your PC.
How to Connect iPhone to Windows PC
Connecting your iPhone to Windows PC is very easy. Whether you want to transfer photos, back up your files, or sync music, there are several comprehensive methods you can use.
Method 1: Connect iPhone to Windows PC Using USB Cable
The most useful method is through a USB cable. It may be your charging cable itself. By using this method, you can direct transfer files from iPhone to Windows PC and reverse.
Step 1. When you connect your iPhone for the first time, you’ll see a pop-up on your phone asking: “Trust This Computer?” Tap “Trust”.

Step 2: Enter your Passcode. This step allows your PC to access your iPhone’s data.

Step 3: Now go to your Windows 11 PC and follow these steps.
Press Win + E shortcut key or simply open This PC to open File Explorer.
Under Devices & Drives, you will find your iPhone alongwith another Windows 11 drives.
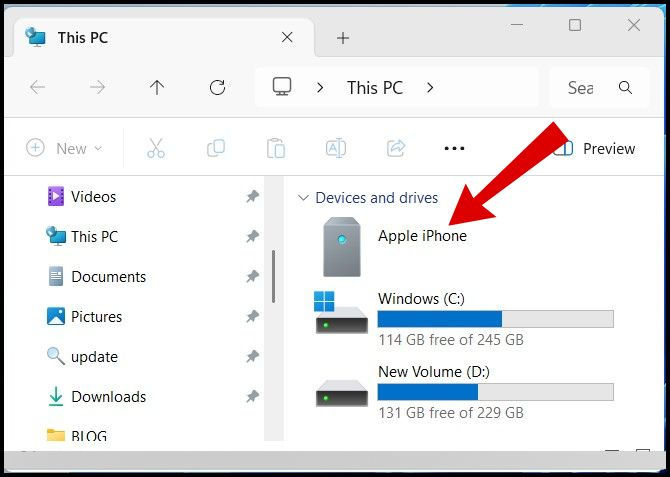
Now go to your iPhone
Open Internal storage, look for DCIM folder and other folder to find out Media files.

Here you can easily copy or paste video and photos (Media files only).
Method 2: Connect iPhone to Windows PC through iTunes
iTunes is Apple’s official App for handling iOS devices on Windows PC. It allows your device to sync music, videos, apps, and also back up your complete iPhone.
Download and Install iTunes from Microsoft Store or Apple’s official website.

Open iTunes App on your Windows PC.
Plug in charging cable to both the devices iPhone and Windows PC to connect the iPhone to your computer.
“Trust the Computer” message will popup on iPhone, tap on Trust.
On Windows PC, A popup Windows will appear duly asking "Do you want to allow this computer to access information on this iPhone?"
Tap on Continue.

Now navigate Your iPhone in iTunes App on Windows PC. iPhone icon will available at the left side bar In iTunes App. Click it to open your device summary page.

Now Sync and Manage Files.
The following actions, You can apply now:
Sync music, movies, and books
Backup and restore your iPhone
Transfer procured content
Wi-Fi syncing. If your iPhone and Windows PC both on the same wi-fi network, Wi-Fi syncing is also possible.
Method 3: Connect iPhone to Windows PC via iCloud
You can also connect iPhone to Computer wireless by using iCloud for Windows setup. iCloud is the easiest way to sync data between your iPhone and PC wireless. There is no need to use cable. Simply it be done with iCloud.
Step 1: Set Up iCloud on Your iPhone.
Follow these steps:
Settings → [Your Name] → iCloud

Enable the features you want to sync—like Photos, Contacts, Notes, or iCloud Drive.
Step 2: Install iCloud on Windows PC
Download and Install iCloud for Windows from the Microsoft Store or Apple’s website.

Sign in with your Apple ID.

Now go to your iPhone, and allow the device.

Once signed in process completed, you can choose What to Sync:
iCloud Drive
Photos
Mail, Contacts, and Calendars
Bookmarks
Step 3: Click Apply to save settings.
Step 4: Access Your Files.
Step 5: Now open File Explorer by pressing Win + E shortcut key.
Step 6: Go to iCloud Drive to view or edit your synced files.
Your photos will appear in iCloud Photos, and any changes will automatically update across devices.
Method 4: Connect your iPhone to Windows PC via Bluetooth
You can also share or transfer small files, media through Bluetooth. Bluetooth is a handy connection feature as well as using your iPhone like a personal hotspot.
Step 1: Enable Bluetooth on Both Devices
On iPhone: Go to Settings → Bluetooth → Turn On
On PC: Go to Settings → Bluetooth & Devices → Turn On Bluetooth
Step 2: Pair Your iPhone with Windows PC
Go to your Windows PC and follow these steps:
Go to Settings
Click on Bluetooth & Devices.
Click on Add Device.

Select Bluetooth.

Choose your iPhone from the appeared list.
Confirm the pairing code on both the devices.
Step 3: Once successfully paired both the devices iPhone and Windows PC:
You can share small files using the Share menu on your iPhone.
Or, go to Settings → Personal Hotspot to share your mobile data with your PC.
Method 5: Use Third-Party File Transfer Tools
If you frequently transfer large files, you may use various third-party apps available on public domain which provide better and fast performance.
Common Troubleshooting Connection / pairing issues
Sometimes, your iPhone failed to connect / pair to your Windows PC. Follow these steps to iPhone not connecting to PC fix and other such common issues:
1. Update Software
Make sure, both your iPhone (iOS) and Windows PC (including iTunes) are up to date with latest version.
2. Use Original Cable
Non-certified cables often cause connectivity problems. Use an MFi-certified Lightning cable.
3. Restart iPhone and Windows PC.
To restart a device fix various major / minor issues. So restarting device can be used as Initial workaround to fix connection issues.
4. Check Drivers
If iTunes doesn’t recognize your iPhone:
Open Device Manager → Portable Devices
Right-click your iPhone → Update driver
5. Reinstall iTunes
If none of the above workarounds solve your issue, Uninstall iTunes and re-install a fresh version of iTunes for Windows PC.
Final Thoughts
You can connect your iPhone to a Windows PC with the following means:
USB: Best Option for quick file transfers.
iTunes: Perfect for backups and media syncing.
iCloud: Seamless for wireless access.
Bluetooth: Suitable for transfer small files and also convenient for hotspot sharing.
FAQ
Is it safe to connect iPhone to a Windows PC?
Yes, as long as you trust the computer and use a genuine or certified cable. Avoid using public PCs for sensitive data.
Can I sync my music from Windows PC to iPhone?
Yes. Use iTunes to select your music library or playlists and sync them to your iPhone. Make sure Sync Music is enabled in iTunes.
Can I transfer files without a cable?
Yes. You can use iCloud for Windows or apps like AirDrop alternatives for PC to transfer photos, videos, and documents wirelessly. However, iTunes sync over Wi-Fi requires both devices to be on the same network.


Comments